iOS就业
MRC
- 手写Set方法
- (void)setName:(NSString *)name
{
    if (_name != name)
    {
        [_name release]; // relese旧值
        _name = [name retain]; // retain新值
    }
}
UIImage的内存问题
// imageNamed: 有缓存(传入文件名)
//        UIImage *image = [UIImage imageNamed:filename];

// imageWithContentsOfFile: 没有缓存(传入文件的全路径)
NSBundle *bundle = [NSBundle mainBundle];
NSString *path = [bundle pathForResource:filename ofType:nil];
UIImage *image = [UIImage imageWithContentsOfFile:path];
UIImageView帧动画
if (self.tom.isAnimating) return;

// 1.加载所有的动画图片
NSMutableArray *images = [NSMutableArray array];

for (int i = 0; i<count; i++) {
    // 计算文件名
    NSString *filename = [NSString stringWithFormat:@"%@_%02d.jpg", name, i];
    // 加载图片
    NSBundle *bundle = [NSBundle mainBundle];
    NSString *path = [bundle pathForResource:filename ofType:nil];
    UIImage *image = [UIImage imageWithContentsOfFile:path];

    // 添加图片到数组中
    [images addObject:image];
}
self.tom.animationImages = images;

// 2.设置播放次数(1次)
self.tom.animationRepeatCount = 1;

// 3.设置播放时间
self.tom.animationDuration = images.count * 0.05;

[self.tom startAnimating];

// 4.动画放完1秒后清除内存
CGFloat delay = self.tom.animationDuration + 1.0;
[self.tom performSelector:@selector(setAnimationImages:) withObject:nil afterDelay:delay];
Xib文件的加载
-
方法1
NSArray *objs = [[NSBundle mainBundle] loadNibNamed:@"MJAppView" owner:nil options:nil];这个方法会创建xib中的所有对象,并且将对象按顺序放到objs数组中 -
方法2 bundle参数可以为nil,默认就是main bundle
UINib *nib = [UINib nibWithNibName:@"MJAppView" bundle:[NSBundle mainBundle]];NSArray *objs = [nib instantiateWithOwner:nil options:nil];
控制状态栏的样式
从iOS7开始,系统提供了2种管理状态栏的方式:
- 通过
UIViewController管理(每一个UIViewController都可以拥有自己不同的状态栏) - 通过
UIApplication管理(一个应用程序的状态栏都由它统一管理)
iOS 7 之前在AppDelegate中修改
[[UIApplication sharedApplication] setStatusBarStyle:UIStatusBarStyleLightContent];
在iOS7中,默认情况下,状态栏都是由UIViewController管理的,UIViewController实现下列方法就可以轻松管理状态栏的可见性和样式:
// 状态栏的样式
- (UIStatusBarStyle)preferredStatusBarStyle
{
    return UIStatusBarStyleLightContent;
}

// 状态栏的可见性
- (BOOL)prefersStatusBarHidden;
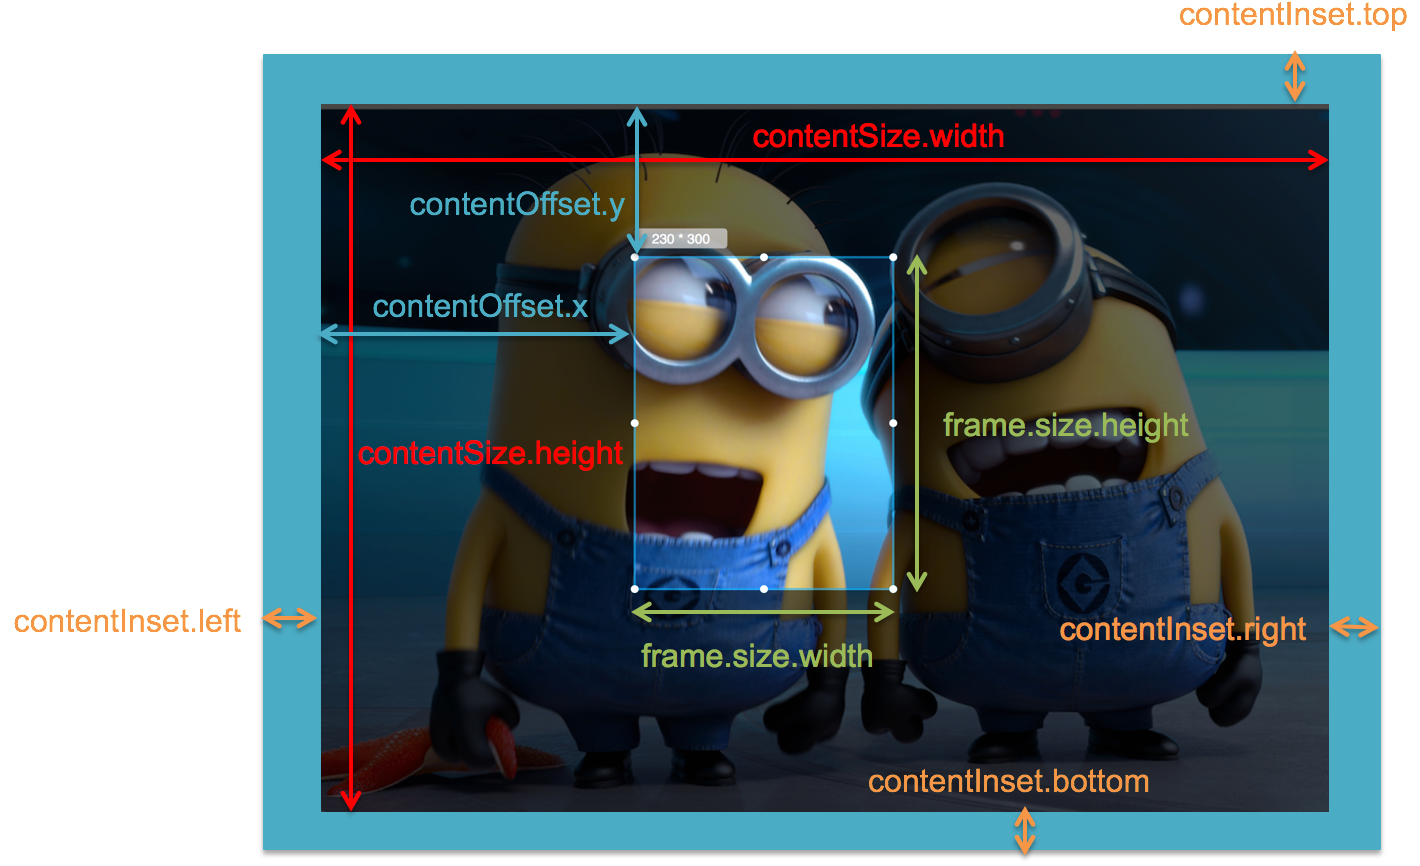
UIScrollView
@property(nonatomic) CGSize contentSize;表示UIScrollView内容的尺寸,滚动范围(能滚多远)
@property(nonatomic) CGPoint contentOffset;表示UIScrollView滚动的位置
@property(nonatomic) UIEdgeInsets contentInset;在UIScrollView的4周增加额外的滚动区域(外边距)
通过设置UIScrollView的id<UISCrollViewDelegate> delegate代理对象实现:
-
滚动
- (void)scrollViewDidScroll:(UIScrollView * nonnull)scrollView -
缩放
- 设置
minimumZoomScale:缩小的最小比例 - 设置
maximumZoomScale:放大的最大比例 - 让代理对象实现下面的方法,返回需要缩放的视图控件
- (UIView *)viewForZoomingInScrollView:(UIScrollView *)scrollView;
- 设置
UIScrollView分页和UIPageControl
- 根据scrollView的
frame来确定分页宽度:scrollView.pagingEnabled = YES UIPageControl:@property(nonatomic) NSInteger currentPage@property(nonatomic) NSInteger numberOfPages
定时器 NSTimer
// 另一种+ (NSTimer * nonnull)timerWithTimeInterval:(NSTimeInterval)seconds invocation:(NSInvocation * nonnull)invocation repeats:(BOOL)repeats
// 需要手动启动 - (void)fire
self.timer = [NSTimer timerWithTimeInterval:1.5 target:self selector:@selector(nextImage) userInfo:nil repeats:YES];

// 注册定时器到RunLoop
[[NSRunLoop mainRunLoop] addTimer:self.timer forMode:NSRunLoopCommonModes];

// 删除定时器
[self.timer invalidate]; // 定时器一旦停止就不能再使用
self.timer = nil;
UITableView
UITableViewCell的重要属性和方法:
@property(nonatomic) UITableViewCellAccessoryType accessoryType
@property(nonatomic, strong) UIView *accessoryView
@property(nonatomic, strong) UIView *backgroundView不用设置尺寸,优先级>backgroundColor
@property(nonatomic, strong) UIView *selectedBackgroundView
- (__kindofUITableViewCell * nullable)dequeueReusableCellWithIdentifier:(NSString * nonnull)identifier
- (__kindofUITableViewHeaderFooterView * nullable)dequeueReusableHeaderFooterViewWithIdentifier:(NSString * nonnull)identifiertableView的头部和尾部视图也可以重用
UITableView的重要属性:
@property(nonatomic) UITableViewCellSeparatorStyle separatorStyle
@property(nonatomic, strong) UIColor *separatorColor
@property(nonatomic, strong) UIView *tableHeaderView
@property(nonatomic, strong) UIView *tableFooterView宽度是tableView的宽度
@property(nonatomic, getter=isEditing) BOOL editing/- (void)setEditing:(BOOL)editing animated:(BOOL)animate
UITableViewDataSource的方法
- (NSArray<NSString *> * nullable)sectionIndexTitlesForTableView:(UITableView * nonnull)tableView返回字符串数组作为tableView右侧的索引条
- (NSString * nullable)tableView:(UITableView * nonnull)tableView titleForHeaderInSection:(NSInteger)section返回section的头部title
- (NSString * nullable)tableView:(UITableView * nonnull)tableView titleForFooterInSection:(NSInteger)section返回section的尾部title
UITableViewDelegate的方法
- (UIView * nullable)tableView:(UITableView * nonnull)tableView viewForHeaderInSection:(NSInteger)section返回section的头部View
- (UIView * nullable)tableView:(UITableView * nonnull)tableView viewForFooterInSection:(NSInteger)section返回section的尾部View
- 开发中的问题:
点击sectionHeaderView时,修改sectionHeaderView的子控件,同时刷新tableView。其中会出现问题:刷新tableView时,会移除旧的sectionHeaderView而重新创建sectionHeaderView添加到tableView中,这样会导致对sectionHeaderView子控件的修改无效。正确的方法是在sectionHeaderView类中重写- didMoveToSuperview方法,在其中处理子控件的修改更新操作。该方法在View被添加到父控件时调用。
使用xib封装一个view的步骤
- 新建一个xib文件描述一个view的内部结构(假设叫做
MJTgCell.xib) - 新建一个自定义的类
(自定义类需要继承自系统自带的
view, 继承自哪个类, 取决于xib根对象的Class) - 新建类的类名最好跟
xib的文件名保持一致(比如类名就叫做MJTgCell) - 将
xib中的控件和自定义类的.m文件进行连线 - 提供一个类方法返回一个创建好的自定义view(屏蔽从
xib加载的过程) - 提供一个模型属性让外界传递模型数据
- 重写模型属性的
setter方法,在这里将模型数据展示到对应的子控件上面
通过代码自定义view
- 重写
init方法,在其中添加需要显示的子控件(不需要设置子控件的数据和frame, 子控件要添加到contentView中),并进行子控件一次性的属性设置(有些属性只需要设置一次, 比如字体\固定的图片) - 重写
layoutSubviews方法,当一个控件的frame发生改变时该方法就会调用,一般在这里布局内部的子控件(设置子控件的frame) - 编写数据模型属性的setter方法: 在这个方法中设置子控件的显示数据
通过代码自定义cell(cell的高度不一致)
1.新建一个继承自UITableViewCell的类
2.重写initWithStyle:reuseIdentifier:方法
添加所有需要显示的子控件(不需要设置子控件的数据和frame, 子控件要添加到
contentView中)
进行子控件一次性的属性设置(有些属性只需要设置一次, 比如字体\固定的图片)
3.提供2个模型
数据模型: 存放文字数据\图片数据
frame模型: 存放数据模型\所有子控件的frame\cell的高度 (提供数据模型的setter方法,在其中计算控件的frame和cell的高度)
4.cell拥有一个frame模型(不要直接拥有数据模型)
5.重写frame模型属性的setter方法: 在这个方法中设置子控件的显示数据和frame
6.frame模型数据的初始化已经采取懒加载的方式(每一个cell对应的frame模型数据只加载一次)
通知机制
- 通知中心
NSNotificationCenter
每一个应用程序都有一个通知中心(
NSNotificationCenter)实例,专门负责协助不同对象之间的消息通信
任何一个对象都可以向通知中心发布通知(
NSNotification),描述自己在做什么。其他感兴趣的对象(Observer)可以申请在某个特定通知发布时(或在某个特定的对象发布通知时)收到这个通知
- 通知
NSNotification一个完整的通知一般包含3个属性:
`(NSString *)name;` // 通知的名称
`(id)object;` // 通知发布者(是谁要发布通知)
`(NSDictionary *)userInfo;` // 一些额外的信息(通知发布者传递给通知接收者的信息内容)
初始化一个通知(NSNotification)对象
+ (instancetype)notificationWithName:(NSString *)aName object:(id)anObject;
+ (instancetype)notificationWithName:(NSString *)aName object:(id)anObject userInfo:(NSDictionary *)aUserInfo;
- (instancetype)initWithName:(NSString *)name object:(id)object userInfo:(NSDictionary *)userInfo;
- 发布通知
通知中心(
NSNotificationCenter)提供了相应的方法来帮助发布通知
- (void)postNotification:(NSNotification *)notification;//发布一个notification通知,可在notification对象中设置通知的名称、通知发布者、额外信息等

- (void)postNotificationName:(NSString *)aName object:(id)anObject;//发布一个名称为aName的通知,anObject为这个通知的发布者

- (void)postNotificationName:(NSString *)aName object:(id)anObject userInfo:(NSDictionary *)aUserInfo;//发布一个名称为aName的通知,anObject为这个通知的发布者,aUserInfo为额外信息
- 注册通知监听器 通知中心(NSNotificationCenter)提供了方法来注册一个监听通知的监听器(Observer)
- (void)addObserver:(id)observer selector:(SEL)aSelector name:(NSString *)aName object:(id)anObject;
observer:监听器,即谁要接收这个通知
aSelector:收到通知后,回调监听器的这个方法,并且把通知对象当做参数传入
aName:通知的名称。如果为nil,那么无论通知的名称是什么,监听器都能收到这个通知
anObject:通知发布者。如果为anObject和aName都为nil,监听器都收到所有的通知
- (id)addObserverForName:(NSString *)name object:(id)obj queue:(NSOperationQueue *)queue usingBlock:(void (^)(NSNotification *note))block;
name:通知的名称
obj:通知发布者
block:收到对应的通知时,会回调这个block
queue:决定了block在哪个操作队列中执行,如果传nil,默认在当前操作队列中同步执行
- 取消注册监听器 通知中心不会保留(retain)监听器对象,在通知中心注册过的对象,必须在该对象释放前取消注册。否则,当相应的通知再次出现时,通知中心仍然会向该监听器发送消息。因为相应的监听器对象已经被释放了,所以可能会导致应用崩溃
通知中心提供了相应的方法来取消注册监听器 `- (void)removeObserver:(id)observer;
- (void)removeObserver:(id)observer name:(NSString *)aName object:(id)anObject;`
一般在监听器销毁之前取消注册(如在监听器中加入下列代码):
- (void)dealloc {
    //[super dealloc];  非ARC中需要调用此句
    [[NSNotificationCenter defaultCenter] removeObserver:self];
}
监听键盘通知
UIDevice类提供了一个单粒对象,它代表着设备,通过它可以获得一些设备相关的信息,比如电池电量值(batteryLevel)、电池状态(batteryState)、设备的类型(model,比如iPod、iPhone等)、设备的系统(systemVersion)
通过[UIDevice currentDevice]可以获取这个单粒对象
UIDevice对象会不间断地发布一些通知,下列是UIDevice对象所发布通知的名称常量:
UIDeviceOrientationDidChangeNotification // 设备旋转
UIDeviceBatteryStateDidChangeNotification // 电池状态改变
UIDeviceBatteryLevelDidChangeNotification // 电池电量改变
UIDeviceProximityStateDidChangeNotification // 近距离传感器(比如设备贴近了使用者的脸部)
键盘状态改变的时候,系统会发出一些特定的通知
UIKeyboardWillShowNotification // 键盘即将显示
UIKeyboardDidShowNotification // 键盘显示完毕
UIKeyboardWillHideNotification // 键盘即将隐藏
UIKeyboardDidHideNotification // 键盘隐藏完毕
UIKeyboardWillChangeFrameNotification // 键盘的位置尺寸即将发生改变
UIKeyboardDidChangeFrameNotification // 键盘的位置尺寸改变完毕
系统发出键盘通知时,会附带一下跟键盘有关的额外信息(字典),字典常见的key如下:
UIKeyboardFrameBeginUserInfoKey // 键盘刚开始的frame
UIKeyboardFrameEndUserInfoKey // 键盘最终的frame(动画执行完毕后)
UIKeyboardAnimationDurationUserInfoKey // 键盘动画的时间
UIKeyboardAnimationCurveUserInfoKey // 键盘动画的执行节奏(快慢)
// 监听键盘的通知
[[NSNotificationCenter defaultCenter] addObserver:self selector:@selector(keyboardWillChangeFrame:) name:UIKeyboardWillChangeFrameNotification object:nil];

// 当键盘改变了frame(位置和尺寸)的时候调用
- (void)keyboardWillChangeFrame:(NSNotification *)note
{
    // 设置窗口的颜色
    self.view.window.backgroundColor = self.tableView.backgroundColor;

    // 0.取出键盘动画的时间
    CGFloat duration = [note.userInfo[UIKeyboardAnimationDurationUserInfoKey] doubleValue];

    // 1.取得键盘最后的frame
    CGRect keyboardFrame = [note.userInfo[UIKeyboardFrameEndUserInfoKey] CGRectValue];

    // 2.计算控制器的view需要平移的距离
    CGFloat transformY = keyboardFrame.origin.y - self.view.frame.size.height;

    // 3.执行动画
    [UIView animateWithDuration:duration animations:^{
        self.view.transform = CGAffineTransformMakeTranslation(0, transformY);
    }];
}
UIPickerView
- 方法
- (NSInteger)selectedRowInComponent:(NSInteger)component
- (void)selectRow:(NSInteger)row inComponent:(NSInteger)component animated:(BOOL)animated
- (void)reloadComponent:(NSInteger)component
- (void)reloadAllComponents
dataSource
- (NSInteger)numberOfComponentsInPickerView:(UIPickerView * nonnull)pickerView
- (NSInteger)pickerView:(UIPickerView * nonnull)pickerView numberOfRowsInComponent:(NSInteger)component
delegate
- (void)pickerView:(UIPickerView * nonnull)pickerView didSelectRow:(NSInteger)row inComponent:(NSInteger)component
- (UIView * nonnull)pickerView:(UIPickerView * nonnull)pickerView viewForRow:(NSInteger)row forComponent:(NSInteger)component reusingView:(UIView * nullable)view自定义pickerView,reusingView:(UIView * nullable)view可重用
UIApplication
UIApplication对象是应用程序的象征,每一个应用都有自己的UIApplication对象,而且是单例的。通过[UIApplication sharedApplication]可以获得这个单例对象。一个iOS程序启动后创建的第一个对象就是UIApplication对象,利用UIApplication对象,能进行一些应用级别的操作。
- 常用属性
设置应用程序图标右上角的红色提醒数字
@property(nonatomic) NSInteger applicationIconBadgeNumber;
设置联网指示器的可见性
@property(nonatomic,getter=isNetworkActivityIndicatorVisible) BOOL networkActivityIndicatorVisible;
- (BOOL)openURL:(NSURL*)url;openURL:方法的部分功能有
// 打电话
UIApplication *app = [UIApplication sharedApplication];
[app openURL:[NSURL URLWithString:@"tel://10086"]];

// 发短信
[app openURL:[NSURL URLWithString:@"sms://10086"]];

// 发邮件
[app openURL:[NSURL URLWithString:@"mailto://12345@qq.com"]];

// 打开一个网页资源
[app openURL:[NSURL URLWithString:@"http://ios.itcast.cn"]];

// 打开其他app程序
- UIApplication和delegate
在app受到干扰时,会产生一些系统事件,这时
UIApplication会通知它的delegate对象,让delegate代理来处理这些系统事件
delegate可处理的事件包括:
- 应用程序的生命周期事件(如程序启动和关闭)
- 系统事件(如来电)
- 内存警告
- …
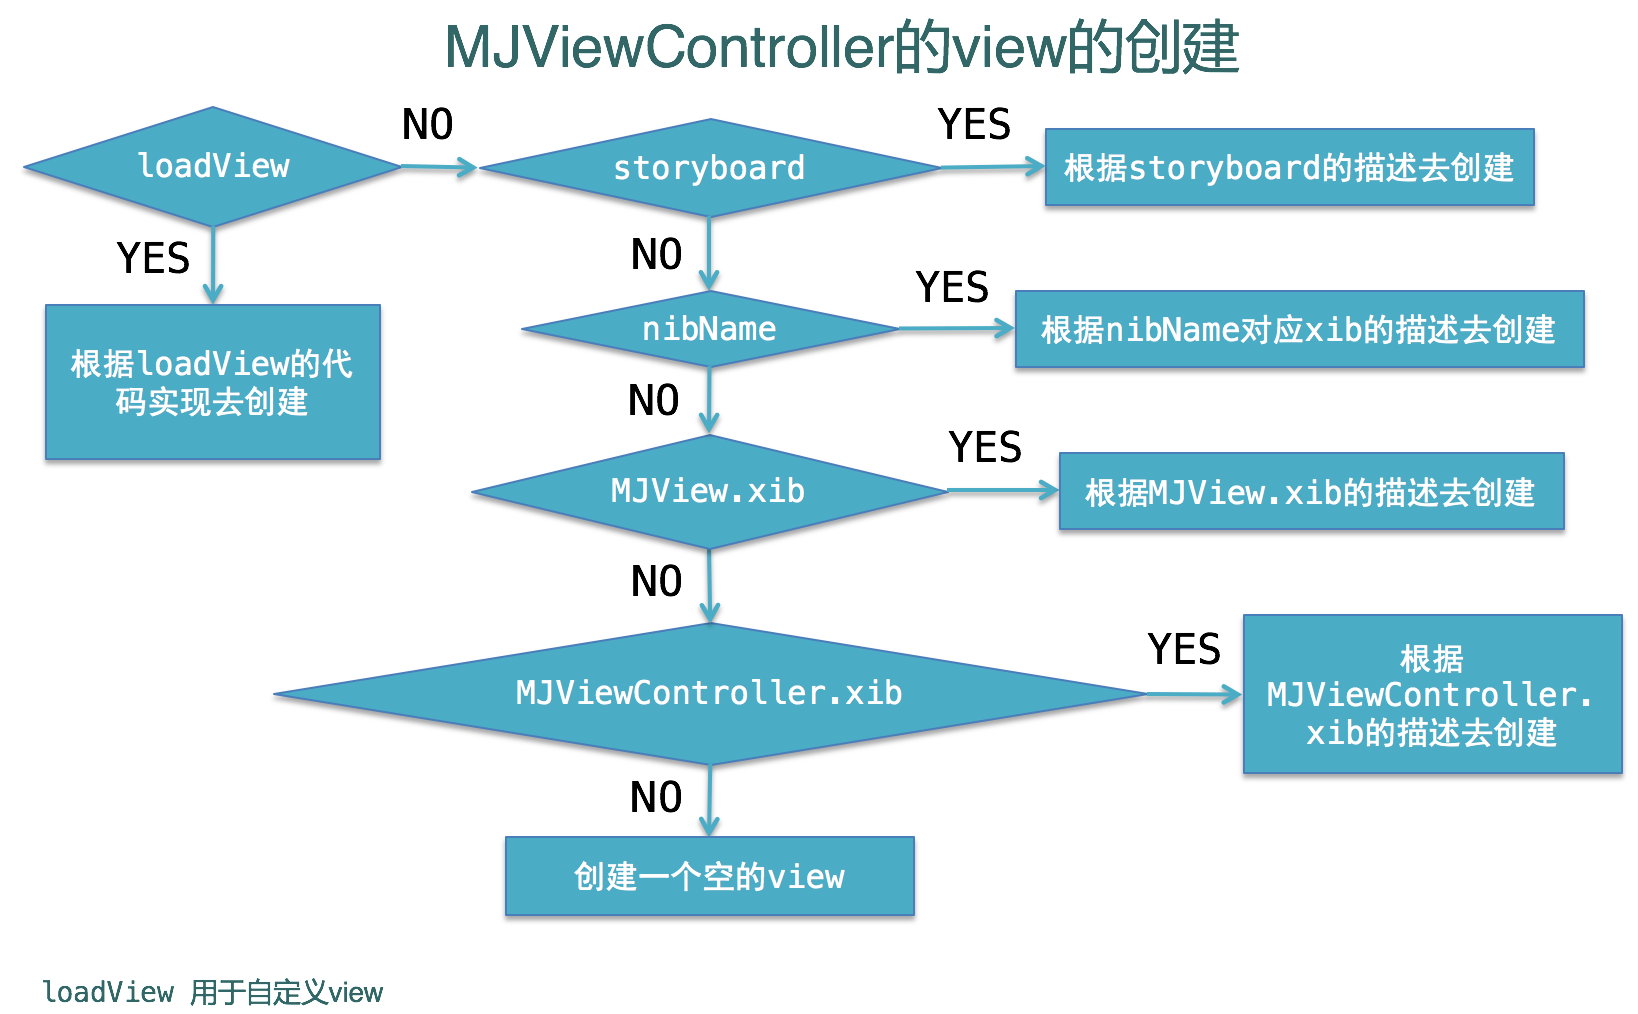
UIViewController以及其view的创建方式
- 控制器常见的创建方式有以下几种
- 通过storyboard创建
MJViewController *mj = [[UIStoryboard storyboardWithName:@"Test" bundle:nil] instantiateInitialViewController]; - 直接创建
MJViewController *mj = [[MJViewController alloc] init]; - 指定xib文件来创建
MJViewController *mj = [[MJViewController alloc] initWithNibName:@"MJViewController" bundle:nil];需要指定xib的类,并连接view
- UIViewController的view的创建
UINavigationController
- UINavigationController的子控制器
// UINavigationController以栈的形式保存子控制器
@property(nonatomic,copy) NSArray *viewControllers;
@property(nonatomic,readonly) NSArray *childViewControllers;

// 使用push方法能将某个控制器压入栈
- (void)pushViewController:(UIViewController *)viewController animated:(BOOL)animated;

// 使用pop方法可以移除控制器
- (UIViewController *)popViewControllerAnimated:(BOOL)animated; // 将栈顶的控制器移除
- (NSArray *)popToViewController:(UIViewController *)viewController animated:(BOOL)animated; // 回到指定的子控制器
- (NSArray *)popToRootViewControllerAnimated:(BOOL)animated; // 回到根控制器(栈底控制器)
- 修改导航栏的内容
导航栏的内容由栈顶控制器的
navigationItem属性决定
UINavigationItem有以下属性影响着导航栏的内容:
// 左上角的返回按钮
@property(nonatomic,retain) UIBarButtonItem *backBarButtonItem;
// 中间的标题视图
@property(nonatomic,retain) UIView          *titleView;
// 中间的标题文字
@property(nonatomic,copy)   NSString        *title;
// 左上角的视图
@property(nonatomic,retain) UIBarButtonItem *leftBarButtonItem;
// 右上角的视图
UIBarButtonItem *rightBarButtonItem
@property(nonatomic,retain) UIBarButtonItem *rightBarButtonItem;
Segue
Storyboard上每一根用来界面跳转的线,都是一个UIStoryboardSegue对象(简称Segue)
每一个Segue对象,都有3个属性:
@property (nonatomic, readonly) NSString *identifier;唯一标识@property (nonatomic, readonly) id sourceViewController;来源控制器@property (nonatomic, readonly) id destinationViewController;目标控制器
根据Segue的执行(跳转)时刻,Segue可以分为2大类型
- 自动型:点击某个控件后(比如按钮),自动执行Segue,自动完成界面跳转
- 手动型:需要通过写代码手动执行Segue,才能完成界面跳转
同时根据类型,还能分为:push、modal和custom。
// push
[self performSegueWithIdentifier:@"login2contacts" sender:nil]; // Segue必须由来源控制器来执行,也就是说,这个perform方法必须由来源控制器来调用
- (void)prepareForSegue:(UIStoryboardSegue *)segue sender:(id)sender;


// 以Modal的形式展示控制器
- (void)presentViewController:(UIViewController *)viewControllerToPresent animated: (BOOL)flag completion:(void (^)(void))completion
// 关闭当初Modal出来的控制器
- (void)dismissViewControllerAnimated: (BOOL)flag completion: (void (^)(void))completion;
UITabBarController
- UITabBarItem
UITabBar里面显示什么内容,由对应子控制器的tabBarItem属性决定。
@property(nonatomic,copy) NSString *title; // 标题文字
@property(nonatomic,retain) UIImage *image; // 图标
@property(nonatomic,retain) UIImage *selectedImage; // 选中时的图标
@property(nonatomic,copy) NSString *badgeValue; // 提醒数字
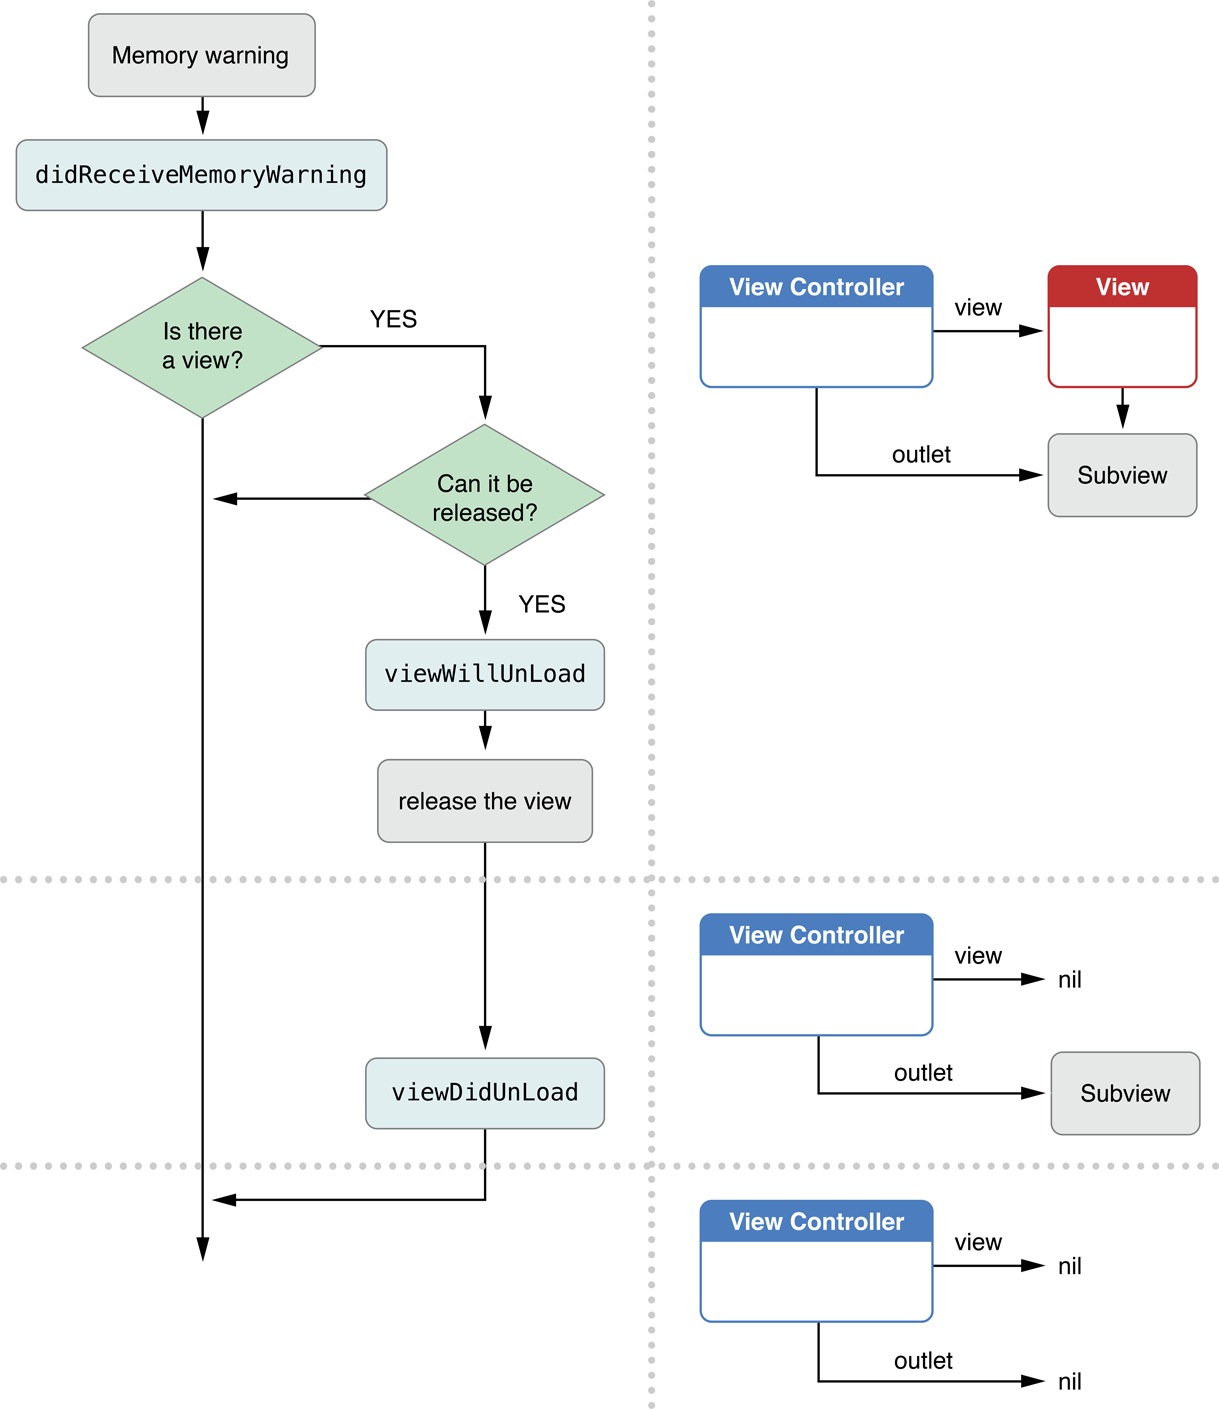
内存警告处理
###
- 水印
// 开启一个基于位图的图形上下文
void     UIGraphicsBeginImageContextWithOptions(CGSize size, BOOL opaque, CGFloat scale)

// 从上下文中取得图片(UIImage)
UIImage* UIGraphicsGetImageFromCurrentImageContext();

// 结束基于位图的图形上下文
void     UIGraphicsEndImageContext();
-
裁剪
void CGContextClip(CGContextRef c) 将当前上下所绘制的路径裁剪出来(超出这个裁剪区域的都不能显示) -
屏幕截图
- (void)renderInContext:(CGContextRef)ctx; 调用某个view的layer的renderInContext:方法即可
注意要点
1.static修饰局部变量,可以保证局部变量只分配一次内存空间。
2.通过代码创建初始化一个对象的时候,才会调用- initXXX方法,当一个对象从xib中创建初始化完毕的时候调用- (void)awakeFromNib
3.编程过程中经常需要拉伸控件的背景图片而保持其不变形,可以使用:
- (UIImage * nonnull)resizableImageWithCapInsets:(UIEdgeInsets)capInsets、
- (UIImage * nonnull)resizableImageWithCapInsets:(UIEdgeInsets)capInsets resizingMode:(UIImageResizingMode)resizingMode
该方法拉伸capInsets分割出的中间部分而保持边缘部分不变形。
@implementation UIImage (Extension)
/**
 *  返回一张可以随意拉伸不变形的图片
 *
 *  @param name 图片名字
 */
+ (UIImage *)resizableImage:(NSString *)name
{
    UIImage *normal = [UIImage imageNamed:name];
    CGFloat w = normal.size.width * 0.5;
    CGFloat h = normal.size.height * 0.5;
    return [normal resizableImageWithCapInsets:UIEdgeInsetsMake(h, w, h, w)];
}
@end
4.编程过程中有时需要通过字符串本身来计算其大小,可以使用- boundingRectWithSize:options:attributes:context:方法。
@implementation NSString (Extension)
- (CGSize)sizeWithFont:(UIFont *)font maxSize:(CGSize)maxSize
{
    NSDictionary *attrs = @{NSFontAttributeName : font};
    return [self boundingRectWithSize:maxSize options:NSStringDrawingUsesLineFragmentOrigin attributes:attrs context:nil].size;
}
@end
5.可以为UITextField在最左边添加一个view:
// 设置文本框左边显示的view
    self.inputView.leftView = [[UIView alloc] initWithFrame:CGRectMake(0, 0, 8, 0)];
// 永远显示
self.inputView.leftViewMode = UITextFieldViewModeAlways;
6.滚动tableView
- (void)scrollToRowAtIndexPath:(NSIndexPath * nonnull)indexPath atScrollPosition:(UITableViewScrollPosition)scrollPosition animated:(BOOL)animated 滚动到某一行
- (void)scrollToNearestSelectedRowAtScrollPosition:(UITableViewScrollPosition)scrollPosition animated:(BOOL)animated//滚动到最接近选中行的位置
6.自定义文本框的键盘: inputField.inputView = XXXX;
自定义文本框键盘上面显示的工具控件: inputField.inputAccessoryView = XXXX;